There are times when it is necessary to manually attach a GeoCue database within SQL server. For instance, when hosting the GeoCue database in a SQL instance on a machine that is not the same as the one hosting the GeoCue Server software.
If you do not have an existing GeoCue database then GeoCue Server delivers two GeoCue template databases that can be found on the GeoCue Server machine after the GeoCue Server software has been installed. In a typical installation these will be found under:
“C:\Program Files\GeoCue\GeoCue Server\DBTemplate”
“C:\Program Files\GeoCue\GeoCue Server\DBTemplate2008”
Within each folder are two files that make up each template database: “GeoCue_Data.MDF” and “GeoCue_Data.LDF”.
Important! Installing a template GeoCue database on SQL Server 2008 R2 or higher requires the database template in the DBTemplate2008 folder.
- Copy the MDF and LDF file from the respective Template folder
- In the GeoCue Common Folder location create a folder called Database
- Paste the template MDF and LDF files in this location
- Modify the file attributes on the MDF and LDF files so as to remove any read locks.
- Open SQL Server Management Studio and login to the SQL Server (and instance if applicable) that the GeoCue database will reside on
- Right Click on Databases and select Attach
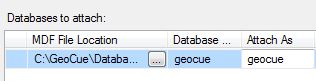
- Click Add and browse to the location of the GeoCue_Data.MDF file in the Database Folder
- Modify the Attach As name to read: “geocue”
- Ensure the database owner is the GeoCue Server Service User
- Click OK to attach the database
At this point a database has been attached within SQL Server. Open GeoCue Database Manager to verify that GeoCue is now correctly reading a database.
If the template was needed for the installation of GeoCue please continue with the installation as outlined in the GeoCue Installation Guide.
