Once the POSPac trajectory batch processing has completed, you will be prompted to view the POSPac report. Click Yes to view the POSPac Report, or No to move to the next step. You may reopen the POSPac report at any time by selecting View Post Process Trajectory Report on the TrueView Utilities toolbar. There are several plots that one should review to ensure a viable trajectory solution before moving on to additional processing steps:
- Rover Data Summary
- Start/End time meets expectations.
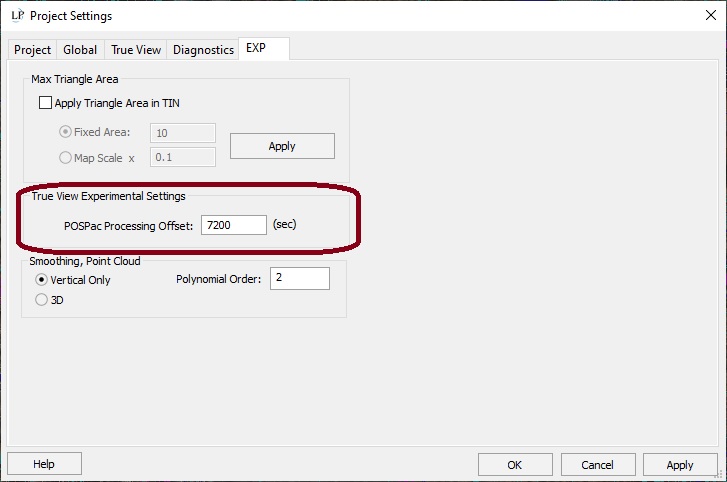
- Start of fine alignment is within a minute or two of takeoff. If it is exceedingly long, it may be due to a known POSPac v8.5 bug resolved in v8.6 that is clipping the ephemeris from the beginning of the Cycle. The issue can be worked around by adjusting the POSPac Processing Offset (EVO -> File -> Project Settings -> EXP -> True View Experimental Settings) (Figure 1) value to a larger number (Default = 30s). Suggested to use 3600 or 7200 if there is an issue.
- Rover Data QC
- Primary Observables & Satellite Data
- L2 Satellite Lock/Elevation
- Review this plot to ensure ephemeris information is available for all satellites for the entire length of the Cycle. If missing ephemeris information for any portion of the Cycle for satellite(s), there is a known POSPac v8.5 bug resolved in v8.6 that can be worked around by adjusting the POSPac Processing Offset (EVO -> File -> Project Settings -> EXP -> True View Experimental Settings) (Figure 1) value to a larger number (Default = 30s). Suggested to use 3600 or 7200 if there is an issue.
- Review this plot to ensure there are not many Cycle slips or data gaps throughout the Cycle
- GPS L2 SNR
- Review this plot for gaps or less than four satellites above 30.
- GLONASS L2 SNR
- Review this plot for gaps or less than four satellites above 30.
- L2 Satellite Lock/Elevation
- Primary Observables & Satellite Data

- Smoothed Trajectory Information
- Top View
- Review the top down path of the trajectory solution and compare to the flight plan and the Cycle position feature files created during the True View Cycle Import.
- Altitude
- Review the profile path of the trajectory solution and compare to expectations
- Top View
- Base Station Information
- Ensure the base antenna manufacturer and model is properly read from the RINEX file. Fix in the RINEX file if it says Unknown.
- Verify the correct antenna height was used.
- Verify the correct base station coordinate was used.
- The Frame, Epoch and Ellipsoid should match that of the survey nail. For instance, a point from an OPUS solution should be Frame: NAD83_2011, Epoch: 2010, Ellipsoid: GRS_1980
- GNSS QC
- GNSS QC Statistics
- Look for 100% fixed solution, minimum four satellites (preferably many more) and a maximum PDOP less than 3.
- Forward/Reverse Separation
- Ideal 1-2cm in Easting/Northing and less than 5cm in down for single base processing.
- PDOP
- Ideally well less than three across the board
- GNSS-Inertial Processor Configuration
- Verify the correct GNSS lever arm and mounting angles were used for your 3DIS and drone configuration.
- Smoothed Performance Metrics
- Position Error RMS (m)
- Ideal 1-2cm in Easting/Northing and less than 5cm in down for single base processing.
- Position Error RMS (m)
- Forward Processed Solution Status
- Processing Mode
- Should be zero (Fixed NL) across the board. May have some portion at the very end that loses lock.
- Processing Mode
- Baseline Length
- Shows the 3D distance between the base station and the True View throughout the Cycle. Ensure it falls within expectation. Review the Base Station Location used for processing if it does not.
- Export Summary (TrueView EVO Only)
- Output Units (Coordinate) should be in the units of your project
- Height option, Grid, Zone, Datum, Ellipsoid and Target Epoch should match that of your True View EVO project SRS.
The results of this process will be corrected position and orientation, which will be saved in a file named PostProcessedTraj.txt located in the POS folder in the EVO project folder.